What makes engineering paper different
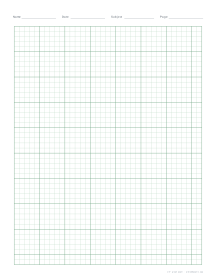
Ask an engineering student for a sheet of paper and you’ll probably get something pale green with a faint grid you can barely see. In the US it is often sold as an engineering computation pad. It looks like graph paper, but several details set it apart:
- Five squares per inch, with a heavier line marking every inch.
- Light green paper rather than white.
- The grid printed on the back of the sheet, showing through to the front.
- A header block at the top of the front with spaces for name, date, subject and sheet number.
- Often a left margin and top margin ruled on the front, leaving a clean area for binding and titles.
- Three-hole punched along the left edge for a binder.
Each feature exists for a reason, and understanding them helps you decide which ones you actually need.
Why five squares per inch
Five to the inch makes each square 0.2 inch (5.08 mm), which is fine enough for compact handwriting yet coarse enough to see easily. More importantly, it fits decimal thinking. Engineers working in inches typically measure in tenths and hundredths rather than fractions, and two squares make exactly 0.4 inch, five make 1.0. Plotting a graph where one inch represents 10 units, each square represents 2: easy arithmetic.
The bold line every inch helps you count squares without losing your place and lets you scale a sketch quickly. It also makes the paper useful as a rough ruler.
The green tint and the hidden grid
The light green colour is usually explained as comfort and recognisability: a pale tint softens the contrast of bright white paper during long problem sets, and nobody mistakes a page of engineering paper for anything else. No standard requires it, and the grid works just as well on white.
The grid on the reverse is the clever part. Printed on the back, the lines show through softly enough to keep columns of numbers straight and sketches square, but they don’t clutter the front. The reason usually given is copying: a copier sees mostly the front, so the work reproduces as clean writing on a nearly blank page, which mattered for submitting calculations and filing them in project records.
How engineers lay out work
Engineering courses and firms have their own house styles, but some conventions are widespread:
- One problem per page. It makes grading, checking and filing straightforward.
- Write on the front only. The back carries the grid, and work on both sides is hard to photocopy.
- Given, Find, Solution. Many instructors teach students to start each problem by listing what is given and what must be found, sketching the system, then working the solution step by step.
- Units on every number. Carrying units through each line catches errors early.
- Box the final answer, with units, so a reader can find it at a glance.
- Number pages, often as “page 2 of 5”, so a calculation package can be reassembled.
Lettering
Engineering drawings have long used upright, single-stroke capital letters in a simple Gothic style, because they are quick to write and hard to misread. Students are often taught to letter calculations the same way. The five-per-inch grid helps here: capitals about one square tall (0.2 inch) are a comfortable size for hand calculations, and titles can take two squares. Notes on formal drawings are usually smaller still, around 1/8 inch. Keeping letters aligned to the grid lines makes columns of figures line up without a ruler.
How our engineering paper differs
A home printer can’t easily print a grid on the reverse that shows through to a clean front, so our engineering paper puts the grid on the front of the page, in a pale green that stays quiet under handwriting.
- Our engineering paper1/5 in squares, bold every inch, pale green, with a header
Here is how the pieces map:
| Traditional pad | Our printable |
|---|---|
| 5 squares per inch, bold every inch | Same: 1/5 inch spacing, bold line every 5 squares |
| Grid on the back | Grid on the front in a light green line colour |
| Green paper | White paper by default; set a paper colour or load green stock |
| Printed header | Header fields for Name, Date, Subject and Page |
| Three-hole punched | Print and punch, or bind in a folder |
If you want the classic look, load light green paper in your printer rather than printing a coloured background, which uses a lot of ink. On lightweight paper you can also experiment with printing the grid in a darker green and writing on the reverse side; whether it shows through enough depends on your paper.
A few other settings can be useful:
- Pages in the PDF: print a full pad of 25 or 50 sheets with page numbers.
- Line colour: swap green for grey if you will scan your work in colour and want a neutral background.
- Metric option: if your course works in SI units, 5 mm graph paper with a bold line every centimetre gives a similar feel on A4.
Engineering paper vs other grids
| Paper | Spacing | Best for |
|---|---|---|
| Engineering | 1/5 in (5.08 mm), bold every inch | Calculations, problem sets, quick technical sketches |
| 1/10 inch | 2.54 mm, bold every inch | Plotting data precisely, fine scale drawings |
| 1/4 inch (quad) | 6.35 mm | Algebra, floor plans at 1/4 inch = 1 foot |
| 5 mm | 5 mm, bold every cm | Metric technical work |
Engineering paper sits between the quad-ruled grid most students learn on and the dense tenth-inch grid used for precise plotting. On one sheet:
| Paper | Engineering 1/5 in | 1/10 in | 1/4 in | 5 mm |
|---|---|---|---|---|
| US Letter | 37 × 50 | 75 × 100 | 30 × 40 | 38 × 50 |
| A4 | 37 × 54 | 74 × 109 | 29 × 43 | 38 × 55 |
1/5 inch or 5 mm?
The two grids look identical up close, but they are 1.6% apart, and the gap grows square by square:
| Squares counted | 1/5 inch grid | 5 mm grid | Difference |
|---|---|---|---|
| 5 | 25.4 mm (1 in) | 25 mm | 0.4 mm |
| 10 | 50.8 mm | 50 mm | 0.8 mm |
| 25 | 127 mm (5 in) | 125 mm | 2 mm |
| 50 | 254 mm (10 in) | 250 mm | 4 mm |
So a drawing measured on one and transferred by counting squares to the other comes out 1.6% off. Keep to one grid for a whole project.
Printing it accurately
Because the whole point of the grid is measurement, print at 100% / Actual size. Check by measuring across one inch of bold lines, or better, five inches: it should come to exactly 5 inches (127 mm). If it is off by more than half a millimetre, the print-at-actual-size guide and printer calibration will fix it.